How to Change OST File Location in Outlook 2013 ?
By default, to set up storage location of Outlook data file (.ost and .pst) then, users need to make some changes to the registry. After they have done this change, you can create a new copy of data at any time, Outlook will place that data file in the preferred location. These instructions will apply to the previous version of Outlook but still, the location will be slightly different. Therefore, in the following segment, we are going to discuss how to change .ost file location in Outlook 2013.
Manually Change the Default Location of Outlook
There are following steps that helps to set the location of Outlook data file given below:
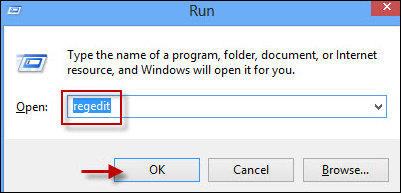
Step 1: Start Regeditry Editor by accessing regedit program in the Run (Win + R) or search dialog box
Step 2: Go to the desired path:
Computer\HKEY_CURRENT_USER\Software\Microsoft\Office\15.0\Outlook
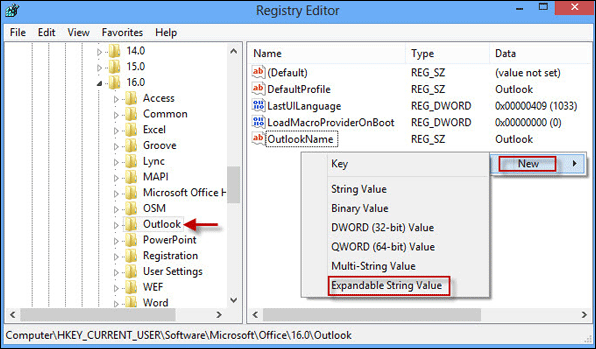
Step 3: Then, right-Click on blank space of right side, select New option and then, click on String Value
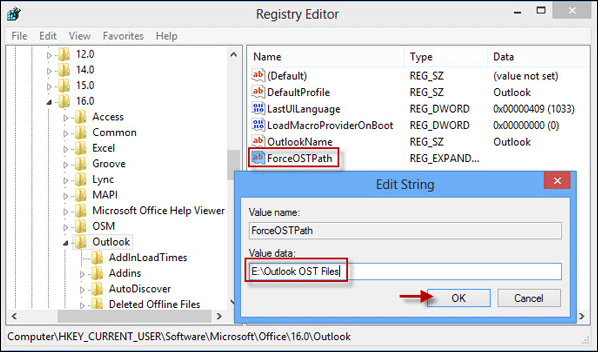
Step 4: Now, name of the newly created string value is ForceOSTPath and double-click on it. In the Edit string, type the particular location under the value data dialog box and then, click OK button. It will change the previous or default path of Outlook data file to a new location
Step 5: Exit Registry window and restart the system to make some changes
Note: The path of Outlook data file is changed, and create the new .ost files and save it to the desired location. However, it does not change the existing location of OST file.
Move Outlook OST to Another Location
Unfortunately, to set the new location of offline OST file users need to create a new profile. Once the account is created, it will save the default location as well. To utilize a new location of .ost file then, users have to recreate them again.
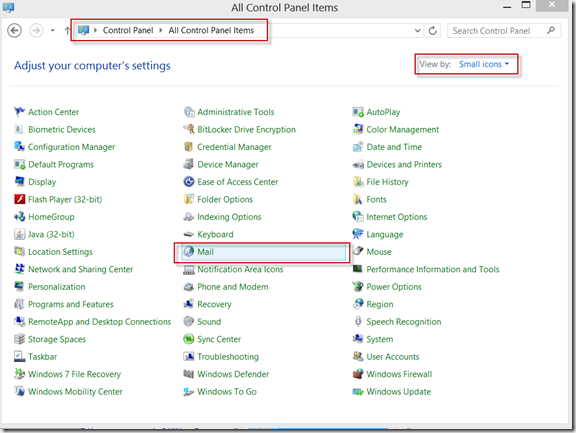
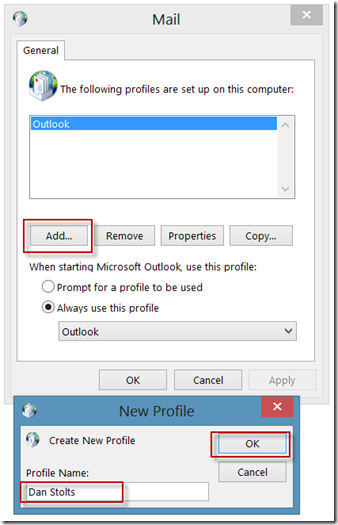
Step 6: Go to Start and click on Control Panel. After that, navigate to Mail option. Next, we will create the new profile and rebuilt the OST data file
Step 7: Click on Add, enter the Name that you want to give the account and then, press OK. Now, Auto account Setup wizard panel will open on the screen
Step 8: Setup an email account (Exchange or ActiveSync) first, by entering the file name, email address and password. This setup can be fully automated
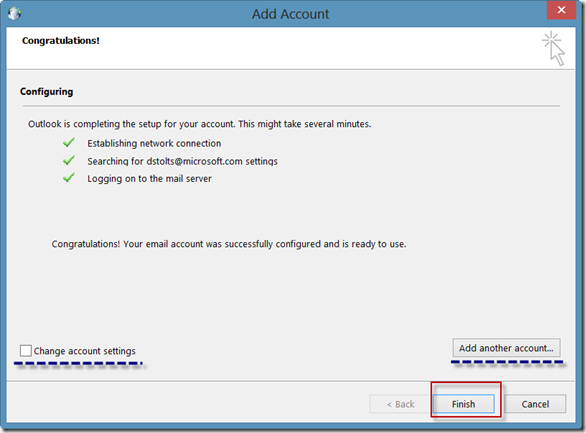
You noticed that if you want to change the account settings or may add another profile from the current wizard. just click on Finish to complete your account setup
Step 9: By default, you have to set up a new profile. Do the same, by clicking on Always use this profile box and select only one that have created
Step 10: Now, you have to remove the previous account if you want. Deleted account cannot remove existing data files. You just have to go back and perform that manually. The default location of old data files is %USERPROFILE%\Local Settings\Application Data\Microsoft\Outlook
If you want to view the change you can navigate to outlook data file from the mail tab. After this, open the control panel>> Properties>> Data files>> Settings>> Outlook Data File Settings box.
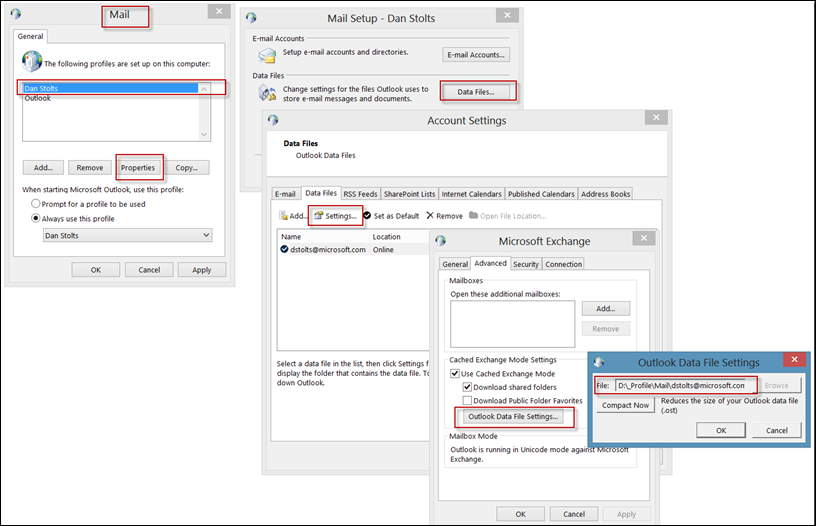
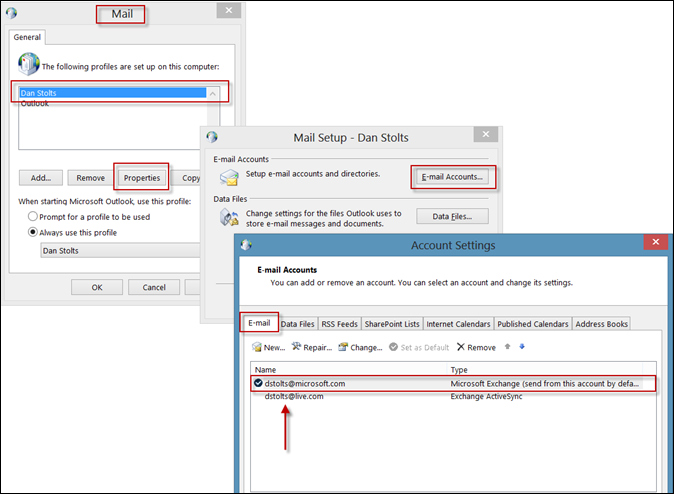
Even you can get the information from an Account settings wizard. Go to the Profile, click on Properties, select an option Email Accounts and choose E-Mail Tab. Click the email address and the path of data will also be listed. You can now go ahead and create the additional accounts if required.
If you wish to copy the old .ost file then, you can easily move it to a new location while it is not in use. In case, if it is in use, then, try to close any application that might need to open. If it fails then, try to restart your system and not running MS outlook until after creating a new profile.
Tip: If you get an OST file then, place in this location %USERPROFILE%\Local Settings\Application Data\Microsoft\Outlook folder because there is also an .ost file with the same name in the desired folder. Try to move it somewhere else. You can even try to copy it back once you have successfully setup your mail account.
Limitations of Manual Solution
The manual approach requires much time for completing the entire process
It can cause the risk of data loss when performing the above procedure
Easiest Way to change OST File location
The above-stated method has a large number of disadvantages when users try to change the location of .ost file. After considering all these constraints, it is better to opt an automated solution for the same. One such solution i.e., Change OST to PST software, which is designed to change outlook ost file to pst file format without any data loss. Moreover, it is capable enough to recreate a copy of .pst file on another place.
Wrapping Up
Most of the users want to change the default location of OST data file (OST) in Outlook 2013. Therefore, in above section, we have discussed a direct manual approach for changing the location of an offline .ost file in a quick and efficient manner. Also, recommended one-stop solution named as OST Restore utility that helps to perform the migration effortlessly.